
Somehow the thought of winter camping never occurred to me. For one, I hate the cold, and for two, I don’t really care for snow. Every year when winter arrives, I hibernate along with many other warm weathered canadians who enjoy the other 3 seasons, but know that winter is a time to catch up on movies, tv series, cleaning the house, indoor DIY projects, etc. But this year, somehow that changed. I had been on 14 trips over the season, camping in 9 Ontario Parks, 7 of them brand new, a few cottages, a yurt, etc. I made it out into October, but then I sadly thought, time to head indoors.
Social media is a wonderful thing for me. It shows me the things that other outdoorsy people like me do in the winter. Winter camping for one, was something I was perplexed by? I’d never even considered it until now, but since the idea was sparked in my mind, it wouldn’t rest. Could I possibly be able to camp all year long??? Did I never have to say goodbye or see you in a few months to my favourite activity? Was it truly possible???? The answer was YES and I was determined to find a way to do it, economically, and stay warm in the process!!!!
After lots of research, I learned about hot tents and the various ways people camp in the winter time. Some hot tents were made of a canvas type material and you could put a wood stove inside and camp in it and be toasty warm. SOUNDS AMAZING!! Let’s do it!!! URGGGG wait!… How much? If I was really lucky I might possibly get away with spending $600-$1000??? YIKES! That was not an option and not justifiable! Was my dream shot down before I even got a chance to start it?
One day while on Facebook, I saw a video on one of the Camping pages. Someone was in a tipi. Yes… a TIPI or also known as Teepee and it looked toasty warm. Basically, the tipi was put right over the fire with it inside and you sat in it and it kept you warm. HMMMMM! This sounds like something I could wrap my head around. YES!!
I contacted Robert, the person who posted the video and he explained to me in many comments, posts, videos etc, how they constructed the tipi he posted on Facebook. “We used 30′ trees and placed them all together”… this was not something that I believed I was able to do, but, that didn’t stop my imagination from going crazy and thinking of all the possibilities I could come up with on what I could use to make my very own tipi, so I could camp and stay warm. Robert said, part of making a tipi was that you used whatever you could find on hand to make the shelter work for you, so that is what I did. I started the journey on a 2.5 hour visit to the home depot. First, I would need poles….


I found these steel 10′ poles for $8.97 each. They weren’t too heavy but they were strong. I took one out to check it’s flexibility and it passed. I looked at a lot of other options, but to me, this was the best one I could find. I thought of ways to bind the poles. I wanted them to be easily put together and have as much space inside the tipi as possible for the height I had. I thought of drilling holes at the top and wiring the poles together or putting clamps on them and stringing them together that way. I knew how to put the tipi together the old fashioned way, but I wanted something different. Something super easy, so I went home and continued to ponder and do some research.


I talked to my dad about drilling holes in the poles and explained what I wanted to do. I drew some rough sketches to show him how I wanted to try and link the poles together and have a smoke hole in the top.
template I found on wikihow.com


After some discussion we decided this wasn’t going to work properly. My dad said he could make up a wooden ring that we could use and the next day sent me this.

The idea was to put several pieces of plywood together for strength and drill holes for each pole. Under the wooden ring the poles would have 3″ bolts to go through them to keep the wood from sliding down. Above the wooden ring the poles would have 3″ cutter pins going through them to keep the wooden ring from sliding off.


In the meantime, I checked out the pole situation, setting them up in normal style tipi set up style, tying 3 of the poles together and then laying the rest in between and wrapping the string around them all to secure them. This was very strong and easy, however, I had no idea where or how to put the canvas up on it, or make a smoke hole in the side, etc etc. Setting the poles up did give me an idea of how far apart I could place them and how much space I would have inside of it though.


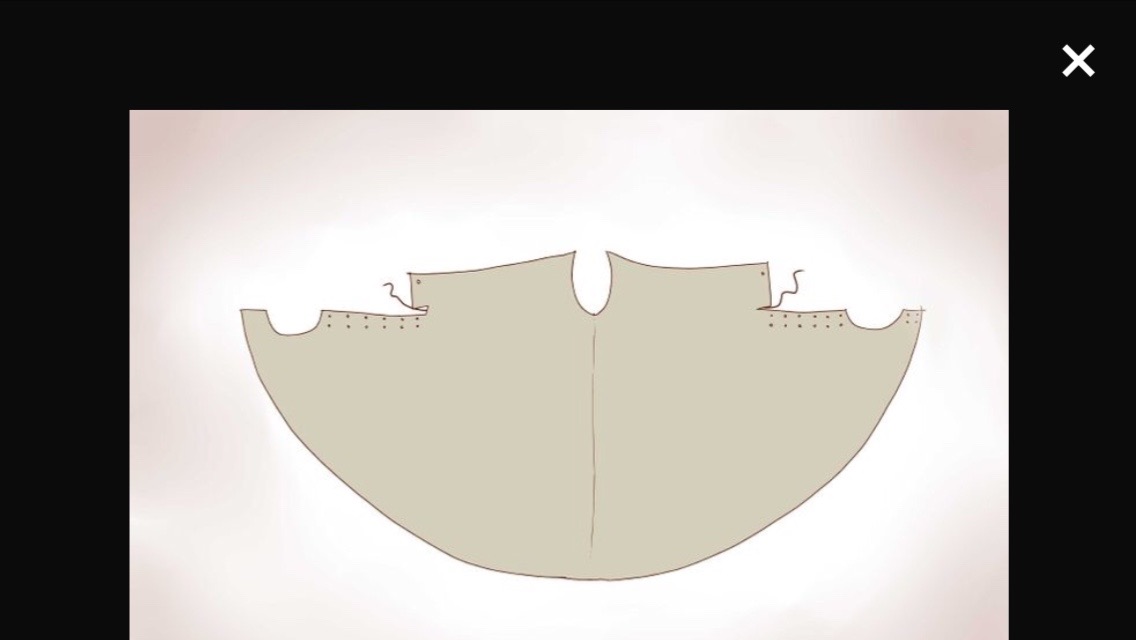
I had decided on using canvas and sourced quite a few places. The best option I found was getting painters drop cloths from Lowe’s. I needed a minimum height of 11 feet (to be safe) and the template on wikihow said you need double the width of the height, so at least 22 feet wide. The drop cloths from Lowes were 12’x 15′ giving me a total size sewn together of 12’x30′.


When I opened up the drop cloths I discovered that one of the 12′ x 15’s was actually 11.8′ x 15′. Not a huge deal but kind of upsetting that they advertised something as a certain size and it was not. I wasn’t about to return it though, so I got out the sewing machine and got to work, sewing 4 seams to ensure the 2 pieces were securely held together. It is not easy, however, to work in a small house with a piece of canvas 12′ x 30′. lol


After sewing the two pieces together I brought it outside to stretch it out in my driveway. It was the only place big enough and clean enough to do so! Thankfully it was a nice day out. According to the pattern and the endless paper cut outs I made, I needed to cut the canvas and round the corners. In order to mark this out, a suggestion from a co-worker, I taped a sharpie to the end of one of the polese and swung it out to each side to make a huge arc. It worked really well!.


On Christmas Day at my dads, we had a big discussion of what we were going to need! We made a list and on boxing day, at 7am when everyone was out shopping for deals, I was at the Home Depot getting supplies to build the wooden ring for my tipi! The next day I put 9 -10′ steel poles in my truck along with 9 cutter pins, 9 bolts with 2 nuts each, washers, wire, the canvas, etc, etc, etc.


My dad was ready and waiting with a tester template. It would have two holes in it and we would put 2 poles in them to see how much of an angle we could get the poles at per each size of hole. In the end we figured a 2″ hole would suffice. On to the round template to drill all the holes in 3 separate wooden rings, bolt them together, sand the edges and put the bolts in for the canvas to hang on to. This part took a bit of time.


When it was all done the poles needed to get holes drilled into them. Each pole got a hole to fit the 3″ bolt in, then bolts were put in with a nut on each side to keep them in place. After that holes were drilled above those to put the cutter pins in and then at the very top of the poles, we put a small hole for a wire to go through to keep the poles from going all harry carry everywhere! We tried it without but they went all over the place and the wire, although it didn’t look like it helped, somehow did!!


After many hours of fidgeting around, thinking it would never work, thinking it would totally work, etc, etc, we finally got the tipi poles up with the ring on it, fairly stable and with the poles all somewhat even, except the door poles which were closer together. The diameter that I thought worked best was about 10′ 5″. I would’ve liked to make it even bigger, but then I would risk loosing the angle to keep the snow/water off the sides.


I took the ring home ready to continue on with the project solo from here on out. I laid out the canvas (12’x30′) as best as I could in the small space I had available, laying the ring on the piece were the canvas would attach to the wooden ring. I sat on the floor for hours staring at it, not able to come to any type of definite plan of where to place the grommets. Today, we had discovered that sometimes when things work on paper, they don’t always work in reality and I was feeling the exact same thing now. I could put the holes where they ‘should’ go, but that didn’t mean it would work out when I put the canvas on the poles.


There was only one solution!!! Go outside, put the poles up and hang the canvas somehow temporarily so I knew exactly where to put the grommets. I put a few grommets in just so the canvas would hang without me holding it so I could do more, as I only had one set of hands. Then, at 10pm, I went into my backyard with my headlamp and huge outdoor light and set up the poles and then put the canvas up. I pulled the canvas around and with a marker, up on a ladder, I noted where each bolt was and where the grommet should go on the canvas. Then I went back inside to put all the grommets in and do what I could further. Several hours later I finally called it a night, anxious to get as much done as possible, but still needing sleep for work in the morning.


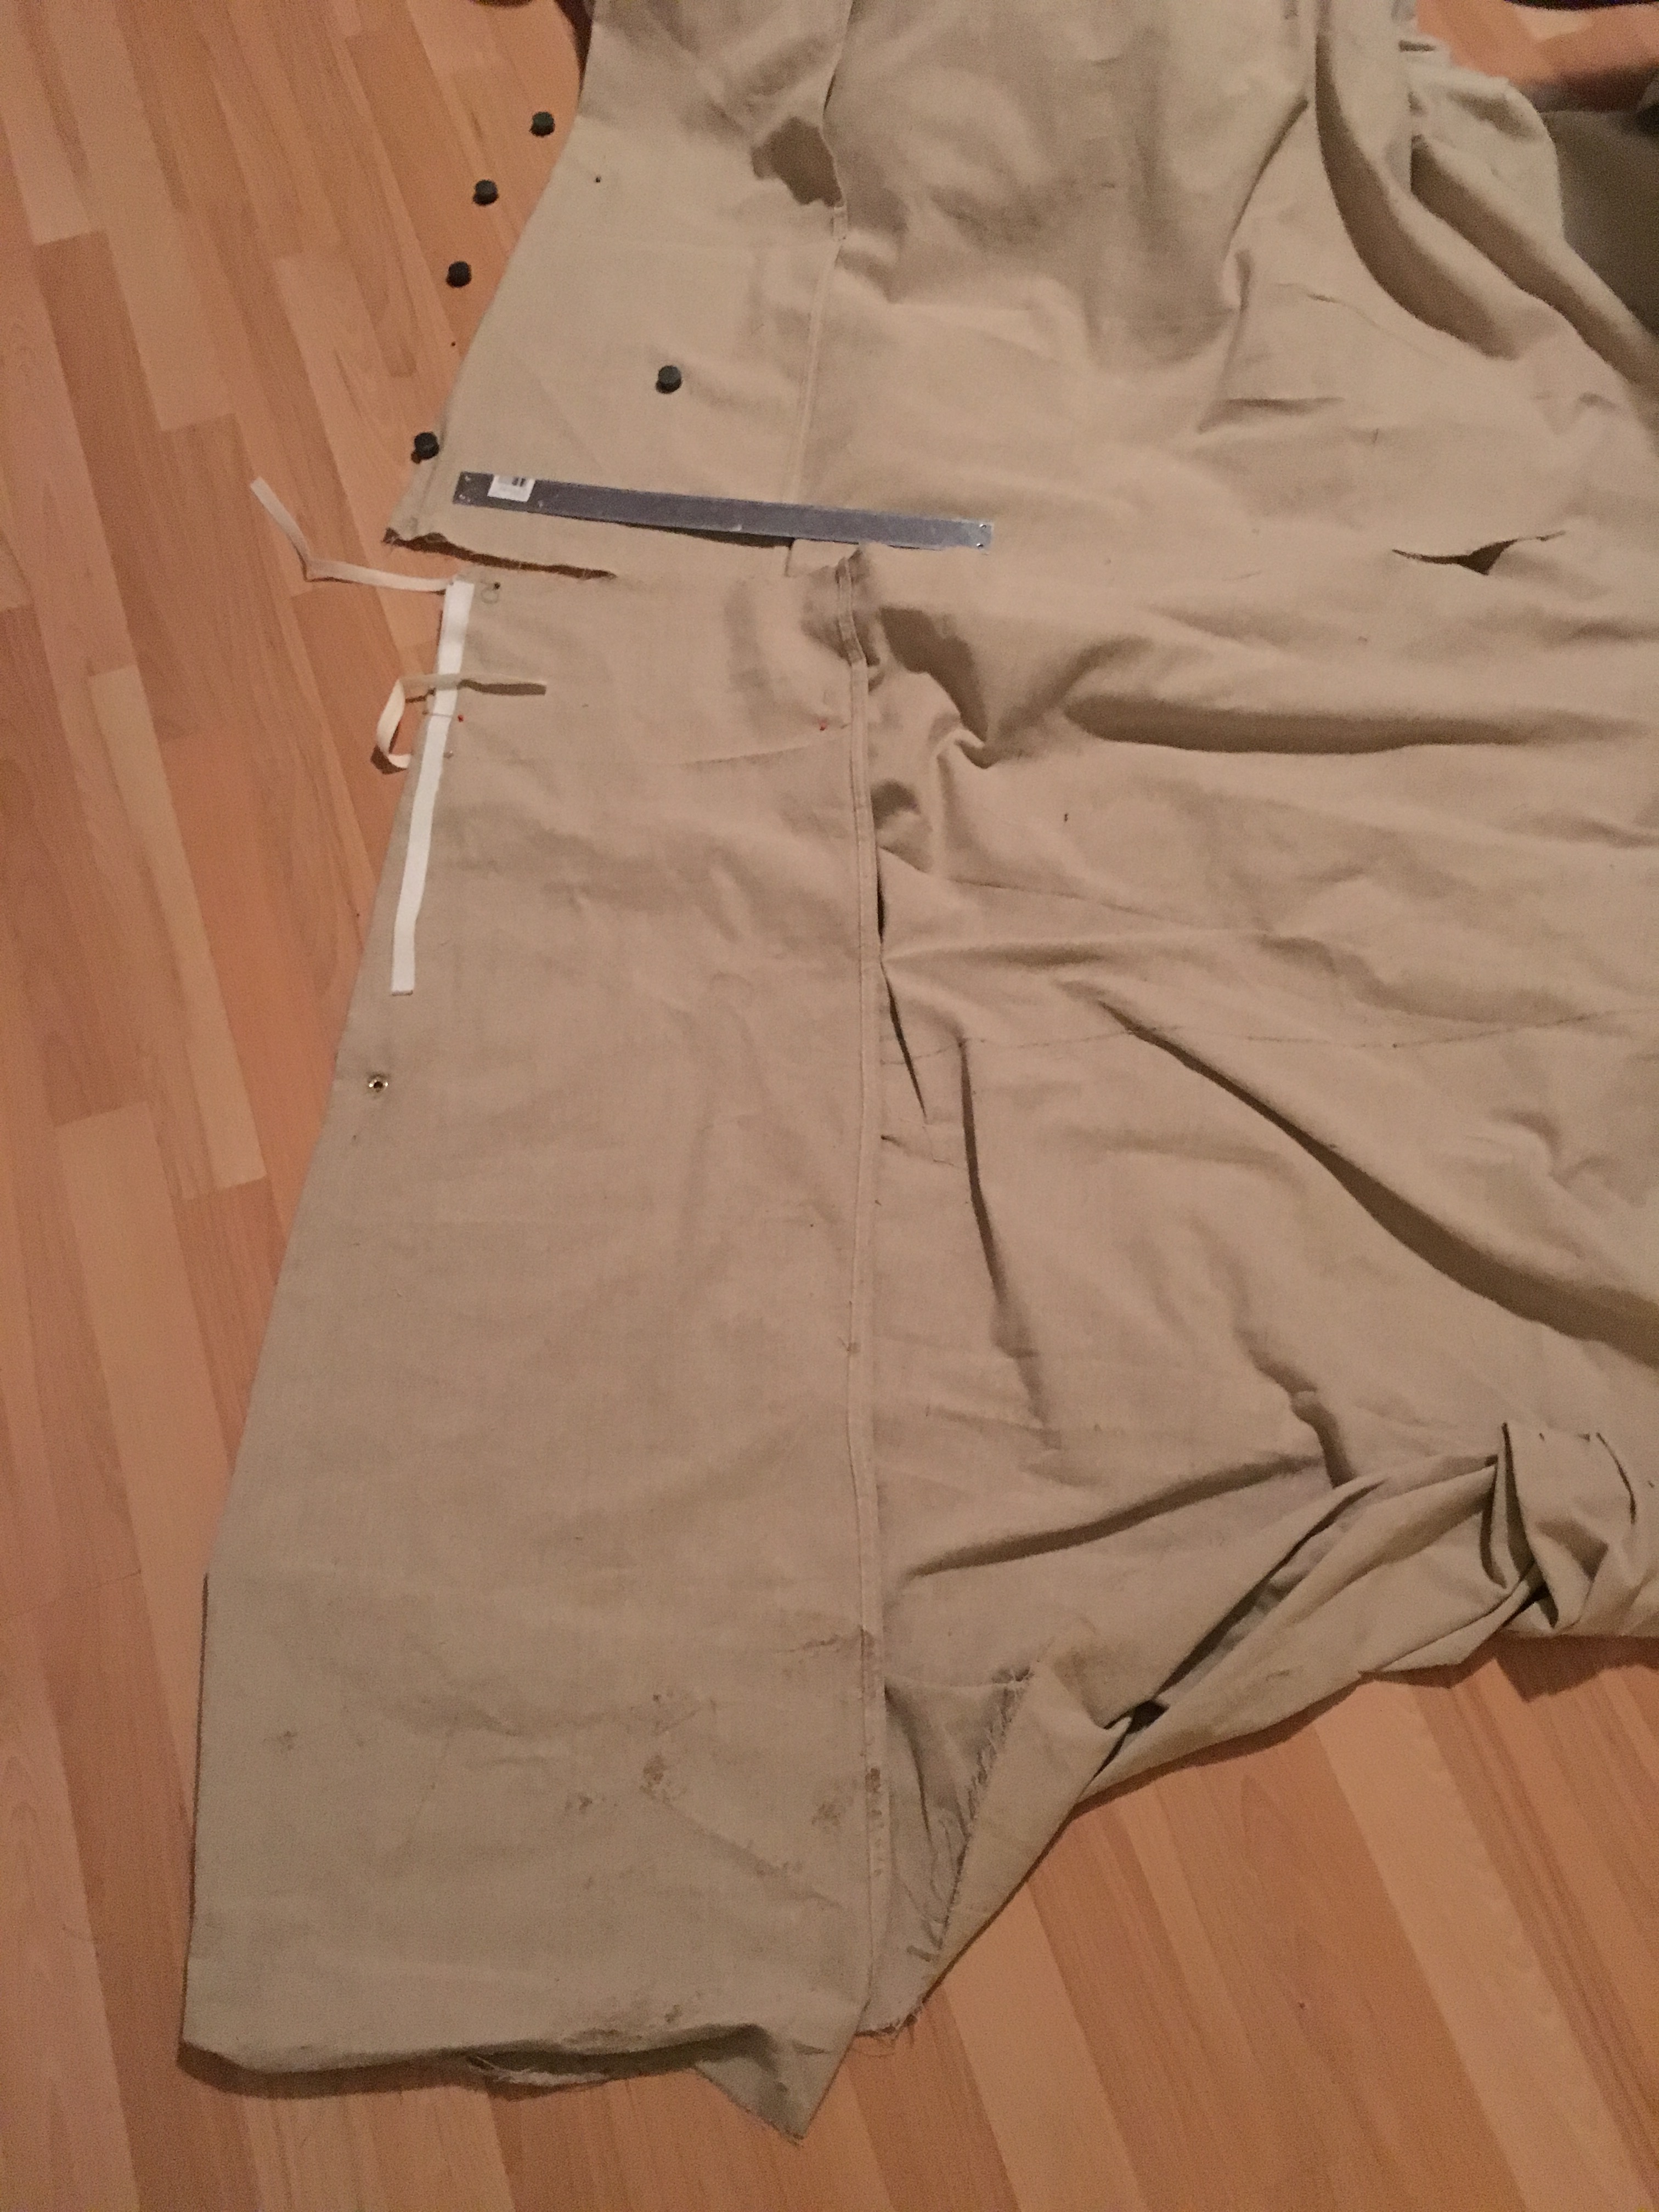
The next day after work, I got right back on the job. It was fairly decent out but we were expecting freezing rain later on, so I had to hurry and get done what I needed to outside before that happened. I put the canvas up with the new grommets I now had in place and then began pinning the canvas where it needed to be sewn, putting ties on it where they needed to go, figuring out where the door would go and how it would be put in, cutting that part, pinning velcro that would be sewn on inside after it was taken off the poles, putting marker circles at the bottom of each pole to stake the canvas to the ground so it would stay put and keep the warmth in, etc, etc, etc.


This process took several hours and then finally I went inside to work, spending a total of about 11 hours on it. I broke about 4 needles on my sewing machine, using heavy duty needles for leather, but that seemed to be irrelevant. My sewing machine gave me some issues but I just keep yelling at it and moved on. Eventually, I got all the seams sewn, all the velcro attached, all the grommets in, all the ties… tied and even patched a hole with a giant “C” to avoid the canvas from running. When i put the grommets in, each one got a coating of nail polish around the holes first to keep the material from fraying. (a trick I’d learned a long time ago, if you didn’t own a bottle of the actual fraying solution they sold at sewing stores). The main 2 top grommets that held the side canvas on the wooden ring, got 2 extra grommets put in, just in case the weight of the canvas or wind or something, pulled out the other grommets I put in. Always good to have a backup.


What I decided to do for the door was based on a friends tent I’ve seen that has a magnetic door. I attached the piece below the door to the first side which would be velcroed to the pole. The bottom piece was then velcroed to that piece and I also added 2 strings to tie it in case the velcro didn’t hold for some reason. I also added a grommet below in both pieces to hold them together with a stake in the ground.
For the door, I cut the canvas and then added a piece to the bottom like a skirt to hang over the bottom piece to seal it shut. I put a piece of steel in the left side of the door (like a steel ruler) and then put magnets in the 1st side that were velcroed to the pole. This gave the door weight and substance and it clicked shut easily with the steel to the magnets. I was really quite proud of my door and couldn’t wait to test it all out! The tipi was literally finished the day before leaving for Algonquin. I packed it in the car along with a box of enviro logs. The wood at the parks tends to be wet and smokes alot and someone had suggested to get these special logs that burn 3 hours at a time and don’t smoke as much. I figured I might need them so we picked some up the day before as well. I didn’t get this exact box, ours were $13.00 for 6 logs, but the same type.


On thursday morning I headed to Mew Lake for New Years Eve! Site#4 was plowed and ready and waiting for us to set up. Now the test would begin! 🙂


We got the poles out of the car and put on the wooden ring, attaching the cutter pins. One was missing however, so I used a tent stake and bent it with a pair of pliers. We ended up finding it later on after the tipi was erected. I would have to go to Home Depot and get a few extras in case any of them were lost in the future. Then the wire was sewn through the tops of each pole and to assist in tightening them, my friend Steph, held up the top 5 poles so I could tighten the wire a bit more than I would be able to do alone. Then I asked her to take photos while I put it up on my own, as I’d done it a few times before. It wasn’t really that hard. Special thanks to Stephanie for the great pictures and for taking on this adventure with me! I knew you would love it! 🙂


After it was standing on it’s own, Steph came over and helped me spread out the poles. This is possibly the most difficult part of the setup. You have to move each pole outwards a few inches at a time, then the next, the next, the next, etc, etc, etc until they are where you want them.

Once they looked about where they should be, I pulled a ‘dad move’ (sure he will be proud of this) and got out my measuring tape I’d brought and Steph and I took the measurements of each poles distance and the diameter all around. It was mostly 10’5″ and they were spread out quite well. I was satisfied with this. I got out my shovel and my 15″ steel rim I’d purchased from Thorold Auto Recyclers for $10 ,and, with the Rangers permission, I dug out a hole the size of the rim to use for the fire pit.


The tipi was far too small to use the Mew Lake fire pit provided as it would leave the useable space inside the tipi next to nothing. Also, the provided pit was buried in snow under a picnic table. *** Just a note that you should never dig on Ontario Parks property without permission. When I was at Mew Lake the week before I was advised by the Warden and a ranger that they would allow me to do this on this occasion which is why I proceeded in purchasing the ring and going ahead with this option. Regardless on having their permission from the week prior, upon arrival, I asked once again to confirm and make sure they didn’t want it in a particular place. I also had to leave the site exactly how I found it, replacing the hole with the dirt I’d dug out and leaving the site as it was before. No trace camping is always the way camping should be done, whether it’s in the backcountry or car camping, etc.


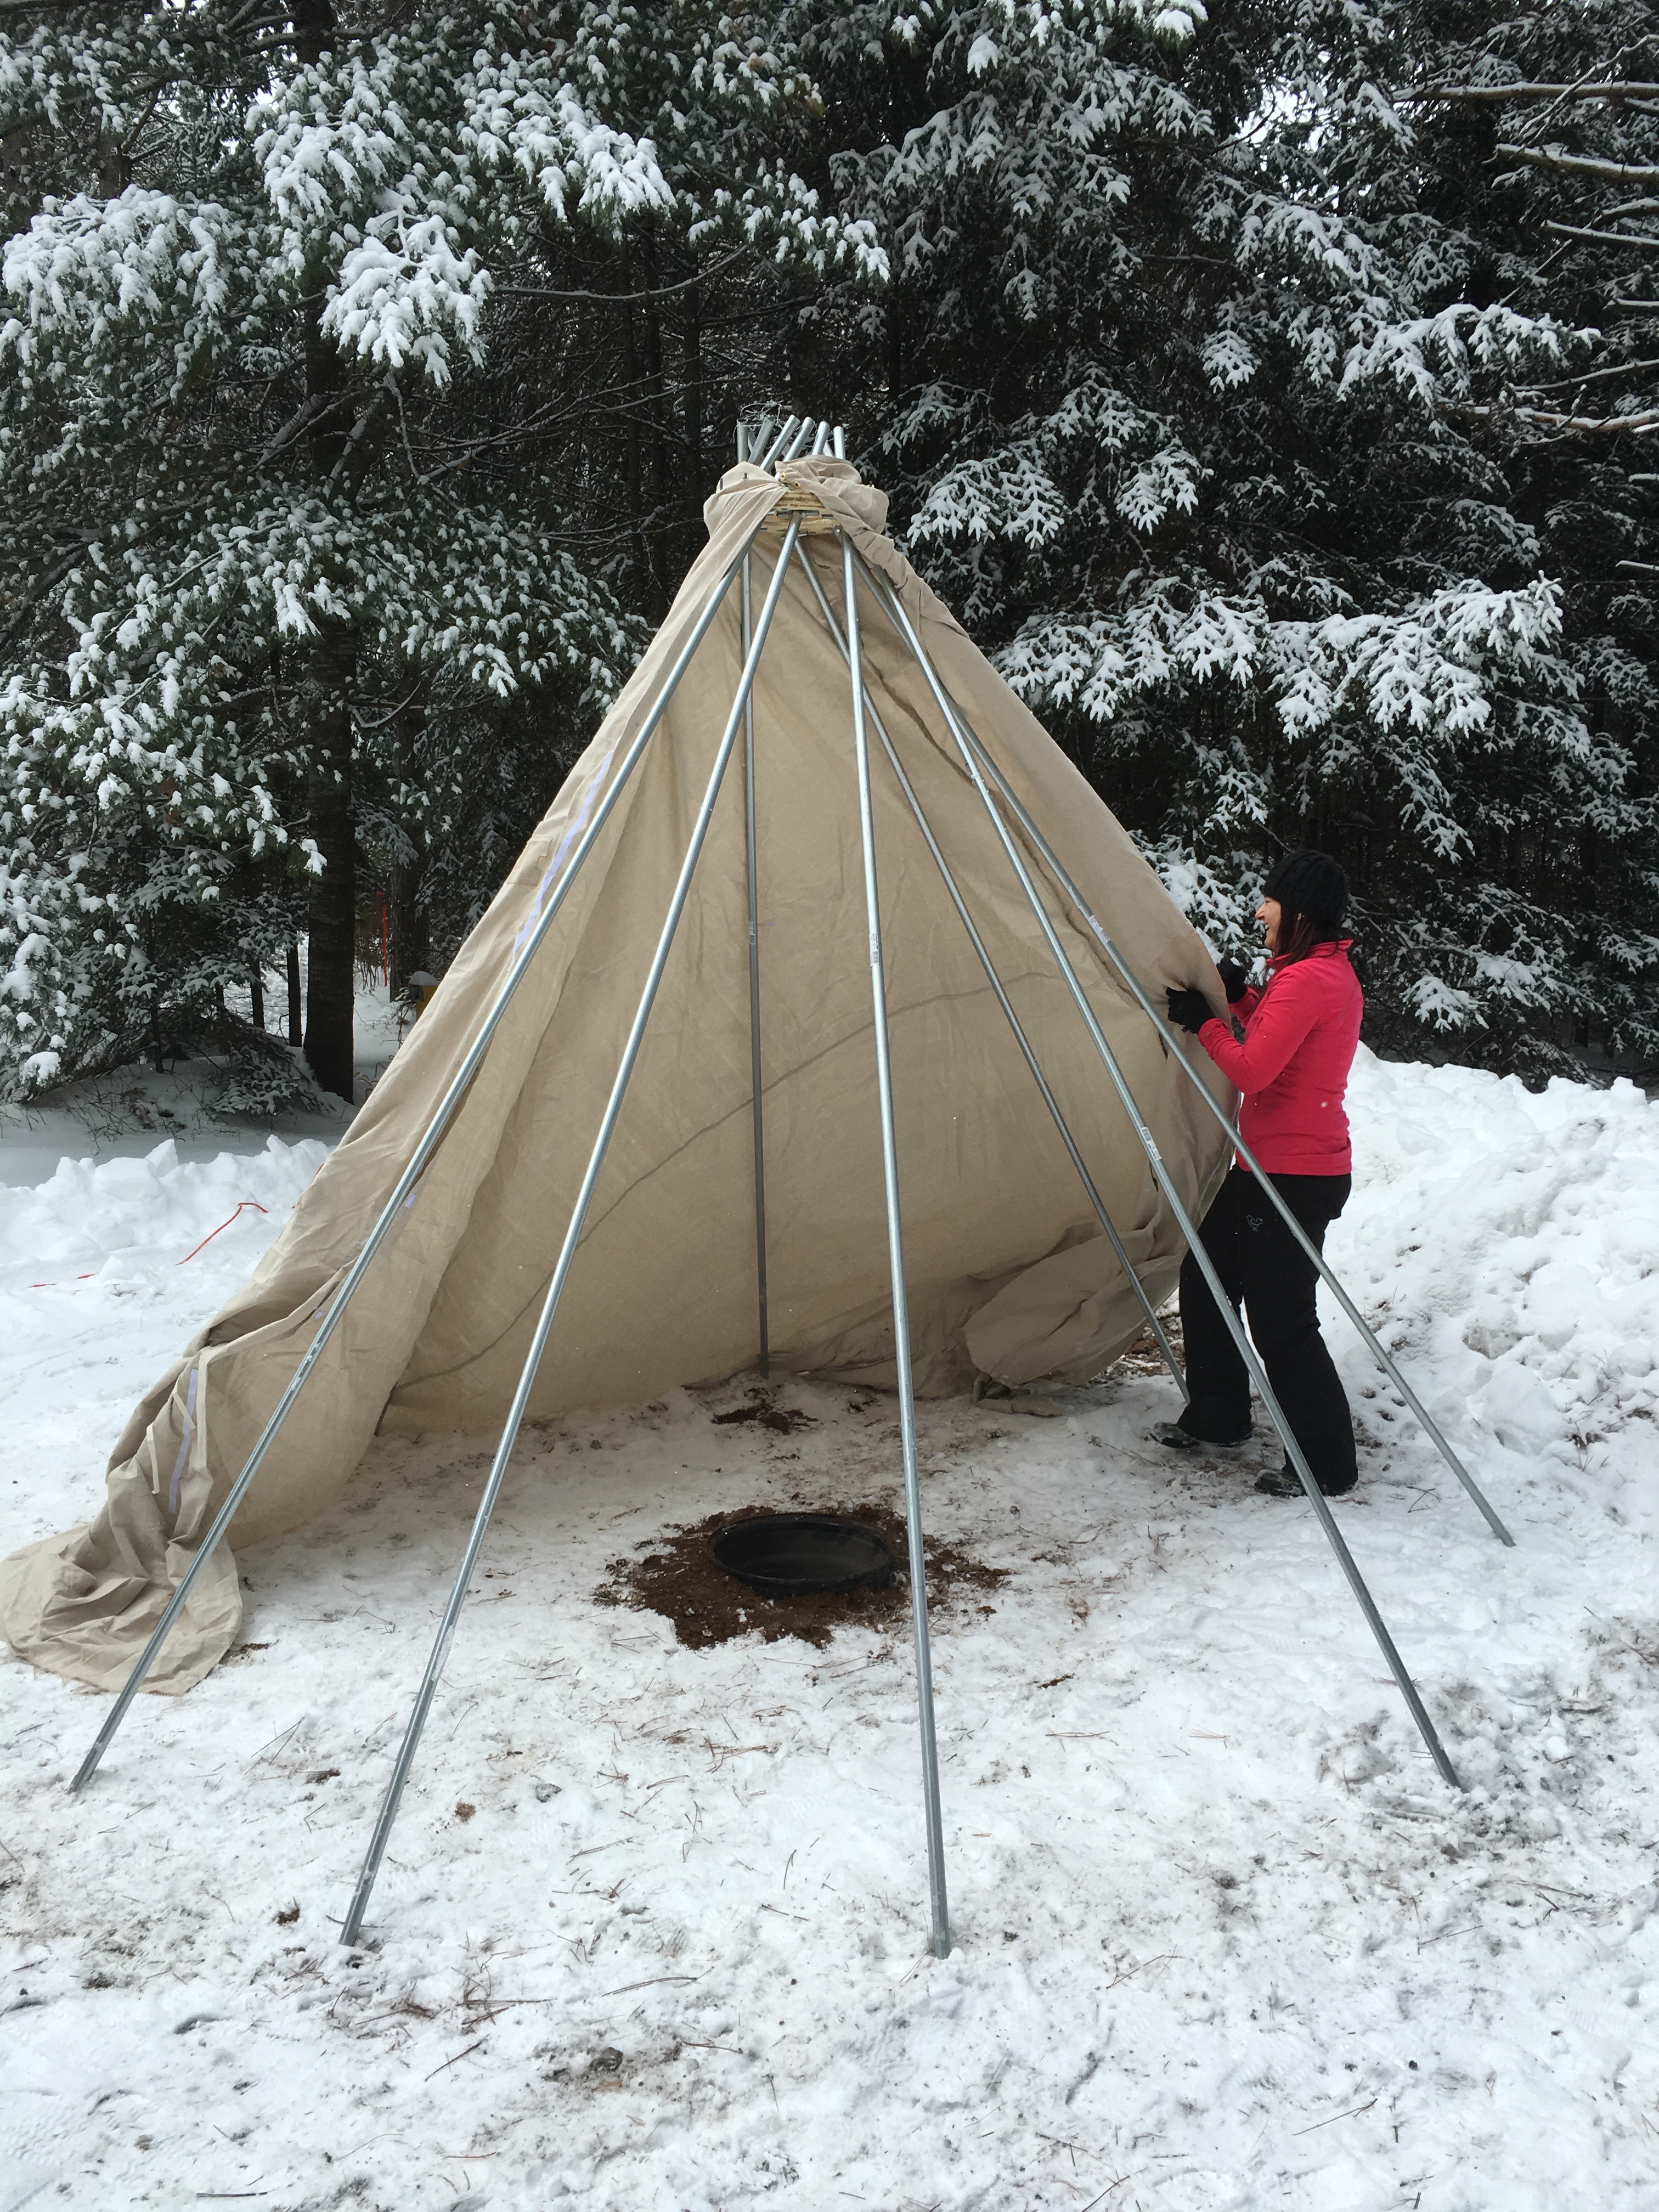
When I originally planned out the tipi, the canvas was to be looped onto the bolts while it was on the ground and the whole structure was to be erected with the canvas attached. After having so many issues with the poles twisting (which the wire at the top seemed to solve) and the weight of the canvas with the poles, I decided to bring my small ladder I use to get my kayak on my car and takes up little space. Having it would make adjustments and setup alot easier. In less than 5 minutes, the canvas was attached, spread out in place and the tipi was ready for use!


The velcro side seams were sealed together and the strings were tied up to the sides with the loops I’d sewn on at home. The piece below the door was attached with the velcro and tied and the grommet put in. Then I went around and put stakes in all the grommet holes at the base of the poles pulling the canvas tight as I’d learned should be done.


The door was closed and it worked amazingly well and I was super proud of what I’d created! 🙂


After setup we decided to go for a walk to the falls and explore our surroundings a bit. It was Stephs first time in Algonquin and I wanted to show off the places I knew here. We headed back afterwards to work on the real test, the fire and if the smoke would evacuate the tipi properly.

We got the fire going and then immediately got smoked out. The wood from the campground was just a bit too wet to use and it smoked horribly. The first revision we had to make was to remove the chairs from the tipi. The smoke rose exactly to our faces when we sat up so high. I had brought some extra tarps and we put them on the ground. I didn’t take a photo but these are the chairs I’d brought just in case that we ended up using. They were fairly comfortable for having to sit on the ground as they had a backrest to lean on.


After a while we also had to open up one entire panel to let the smoke out. This didn’t make the tipi very warm but did let us sit in it by the fire and be able to breathe.


Here are 2 images of how much we had to keep the side open. It was feasible Saturday night, and we were sitting fairly comfortably when the travelling campers arrived at my door to check out my tipi and invite us on a tour of all the other tents that belonged to the group. It was after all, new years eve and time to party! So I explained my tipi process to everyone and got alot of great suggestions on how to overcome the smoke issues throughout the evening from some of the experts in the group. We put the fire out and headed on our adventure and off to ring in 2016!

In the mornings the tipi was used with an electrical heater, door shut to cook and eat our breakfasts. It wasn’t nearly as warm as our tent but comfortable enough to cook food without the use of gloves which is nice to do when able.
I will be making some revisions on the tipi before my next use of it in February camping at McGregor Point. Hopefully, the revisions will resolve the issues and it will work even better the next time around! While looking for solutions to my smoke issue I discovered that my tipi, might not be a tipi at all but something called a Lavvu or even a Goahti? A Lavvu is a temporary dwelling used by the people of Scandinavia. It has a hole at the top and is less vertical than a tipi. ALWAYS LEARNING! 🙂 Here is a shot of a Lavvu from Wikepedia:

I really hope you enjoyed my post and it inspired you to get creative yourself and even try out winter camping if you haven’t already. It is a great adventure and a very peaceful time of year to be out camping in nature. Now that I am able to camp in every season, I will definately be the happiest camper of all…. although, those hot tents will still be in my dreams until that option is feasible for me!
A REALLY HUGE AND SPECIAL THANK YOU TO MY DAD! Without his help with the wooden ring this setup wouldn’t have been possible. I know somehow I would’ve invented something on my own, but it is always really nice to work on a cool project with my dad. He is incredibly smart and creative and has the best tools and I always learn so much from spending time in his workshop with him! Also, thank you to Robert again, for the inspiration and all your encouragement and help with this process. I can’t tell you how nice it is to come across a total stranger who will offer you endless advice and support.
If you have any questions, comments, suggestions, etc, please leave me a message! I’m always happy to hear from people and read about their experiences as well! Stay tuned or subscribe to my blog to make sure you catch my next post on the rest of the trip that I used this tipi during, New Years Eve at Mew Lake , click here.
UPDATE: SHORTLY AFTER THIS POST WAS CREATED, I PURCHASED A WOOD STOVE FOR THE TIPI AND TESTED IT OUT ON A CAMPING TRIP IN MINDEN! CHECK OUT THE POST HERE ON HOW THE WOOD STOVE WORKED OUT!
I HAVE ALSO JUST RECENTLY (NOV, 2016) RENOVATED THE POLES SO THE TIPI CAN GO INTO THE BACKCOUNTRY THIS WINTER!
Happy Camping!
Camper Christina
Great job! Love how you worked with what you could find. Looking forward to reading about your next adventure with it – hopefully the smoke issue gets resolved 🙂
Thanks so much Kristen! Hope you had a great holiday! All the best in 2016! 🙂
You really did the research and provided very useful information. Great job! While this article is not in the mission of our website, LiteCamping.com, I admire the effort and information you put into this. You are truly experiencing the great outdoors and not only learning and enjoying the experiences but also sharing and teaching others to do the same. Kudos to you. Again, great job!
Thanks so much for the great comments and for reading my post! Your remarks really touched me and I appreciate you taking the time to write them. I’m so happy you enjoyed it! Have a fabulous day!
Great job Christina. Really enjoyed reading this article. Glad you did something you really enjoy for New Years.
Awe! thanks so much Loretta! Always so nice to hear from you. I greatly appreciate your words and support! Hope you had a great New years and wish you all the best in 2016! 🙂
Great story, congratulations on your skill to build an economy tipi. Story brought back many memories from the early 50’s, winter camping in Boy Scouts, we had an old army tipi stile canvas tent. Thank you, looked forward to read about your Feb. adventure.
Hey Robert! thanks so very much for commenting ! I’m so glad you enjoyed the post and it brought back some happy memories for you! I will be posting soon on this winter camping adventure as well! Just wanted to get the tipi post out as it was easier to write and I had quite a bit done before my return from the trip. I hope you enjoy them all just the same! Have a great day and hope to hear from you again! 🙂
This is a fantastic posting. Not only did I very much enjoy reading it, but you dialogue and pictures are perfectly clear and the process you laid out would be great to follow. I have the urge to make one myself now … I would dearly love to make one big enough to sleep in, why sleep in a boring old tent when there is such a fabulous alternative that’s way more fun?!.
I haven’t camped in Algonquin in the winter, only in the summer, but Its more and more tempting to do so.
James! Your comment made me feel soooo good and happy! Thank you so much! The one I have is probably big enough to sleep in unless you are 6 or 7′ tall? lol. One of the photos actually before I put the canvas on,I am lying on the ground inside the poles. I believe 2 people could sleep in it fairly comfortably, but even with 12′ poles, the diameter would be increased moreso and that would be even better! I would’ve used them if I’d found some as my kayak is 12′ and I put it on top of my truck (that was the original plan but 10′ is the best I could find)!.
I believe you would need a tarp over it to keep the heat in more however, at one point we had a heater and the fire going and it still was very chilly. I will know more when I use it again in February and will be writing an update!
Only one month ago, I could’ve said the same thing about camping in algonquin, but now I see how much more is going on there. I would strongly suggest you dip your toes in like I did and try a yurt first maybe, then you can walk around and see how other people are set up in their tents etc and if you like it, move to the next step, camping in a tent or your brand new DIY tipi. If you do make one, please share it with me. I’d love to see it! 🙂
I hope to hear from you again! I will be posting the actual trip post on winter camping at Mew Lake next week! Best wishes to you in 2016 and thanks again for making my day! 🙂
Thanks for the further thoughts and suggestions. If I was to build one big enough for the family, I dont think I would be able to transport it!!! In reality, something more like your size would be ideal to go alongside the tent. Its not something I actually need, but I really really want.
I have a mate who I have portaged with a few times, and I think he is pretty interested in giving winter camping a go, hopefully this winter we can make it up north and get a night or two under our belts. I like the idea of the yurt, not only does it sound ideal for the first trip, but the prospect of setting up a tent in deep snow is oddly unappealing!!
Thanks again for the suggestions, I hope your February trip goes well.
Cheers
J
Well actually depending on the park you go to, they plow the sites for you so you don’t have to setup in deep snow. Setting up my tent last week was no different than in the summer except I was much more careful with the poles as they can snap int he cold weather and I was using a summer tent. (i brought a lot of duck tape just in case). Mew lake plows the sites for sure, not sure who else does it but it’s fabulous! They plow it right to the ground. Check out the pics near the bottom of the post and some of the first ones. When i went in the yurt it helped me look around but not a lot of people were winter camping then so I didn’t learn as much as I did new years as lots of people were there and all so friendly and helpful, which is when I would’ve needed the info for! lol. I really think you should give it a try. I was amazed how much I liked it and can not wait to do it again.
As for the tipi size, the one I have is manageable for sure! We could probably sit 6 people in it, we had 4 people sitting on the ground with the fire actually on new years and room for more for sure. The diameter was 10’5″ with only a 15″ fire ring in it so still quite a bit of room to spare. I figure if you made it well and didn’t like it, you could always sell it. I seem to have quite a bit of interest in this one so far so I’m assuming if I wanted to get rid of it I could. I hope you keep me posted if you do build one. I’d love to see how you went about it! 🙂 Thanks again for commenting and reading my post! 🙂
Hey James! I was reading over some of my comments for a project I’m working on and saw this. Did you get around to making your tipi? I just used mine to solo winter camp and it was fantastic!!! I was so warm in it, I was down to a t shirt. It’s possibly the best $200ish I’ve ever spent! 🙂
Hey Christina,
I haven’t put it together yet. I was planning on making it once all the snow had cleared from the backyard and I had room to work properly. I am also concerned that my lack of sewing skills could mean that it would fall apart as soon as the wind picks up!! I am planning on making it around May so that it’s ready for the first camping trip in June
Cheers
James
AWESOME!!! I can’t wait to see it! Make sure that when you put the canvas on it and are getting ready to affix it to the poles you have the poles exactly set to the size you want it. Now that I have increased the diameter, the canvas doesn’t fit as good and I needed to make adjustments. Hope to hear from you again soon! Not sure if you saw my latest post. I camped in it with the stove a few weeks ago. HUGE success! and it was windy. If you are worried about sewing, use grommets and ties. 🙂 Good luck!
Christina! You totally rock! I think I would have given up at step 4…..and I can be determined! Your adventurous spirit is awesome!! I want to go winter camping (I will live through your posts for this season…..but next winter look out)!!! I’m totally inspired – thanks!!! I love that you even think of the back plans with the ground chairs etc. Always planning……so good.
Awe Jen thank you so much for your support and encouragement and all your positive energy! I love it so much and it makes what I do so worthwhile! I believe we are going back for New Years next year! The more the merrier! 🙂 Hope to adventure with you sometime this year! Happy 2016 my friend! 🙂
I think what you did was amazing. You think outside of the box. Or in this case the tipi. Well done. One way to get rid of the smoke is to build a skirt around the poles about 3 feet Starting from the ground and attaché it to the inside of the tipi poles. Then at certain points lift the outside covering to allow the air flow. By doing this more heat will stay inside and your floor will be warmer. Looking forward to reading about the next adventure, enjoy the journey
Thanks so much Robert! Luckily Ihave about a foot and a half extra material that was laying in the snow, I think I will cut that off the tipi and attach it like I did the material underneath door (see pic in post) all the way around. Then the outer or top part of the cover will lay overtop of that attached skirt and will be lifted when needed for airflow. even if I put grommets on the top piece at the bottom edge of it and pull it out with some strings and stakes like when you put a fly on a tent, that should give enough air to create the draft! I appreciate you checking out my post and the comments! thanks very much for doing that! happy 2016! 🙂
Wow Christina, you put a lot of thought and research into this project. Well done.
Thanks Cathy! I definitely did. I am either all in or all out generally. Thanks so much for checking out the post! Glad you liked it! 🙂
Awesome read Christina. Looks like out was lots of fun in the end! !
Thank you Max! it definately was! Looking forward to writing the whole post on the trip next. Hope it does as well as this one! Seems the interest in winter camping is growing! Hope i can inspire others! Happy 2016 and thanks so much for reading and commenting on my post! ! 🙂
Wow, this looks amazing! So much work and research and skill. I am sure you’ll have lots of great camping memories created in this tipi. Happy 2016!
Thanks so much! I really appreciate you stopping by and checking it out and the great compliments! Happy 2016 to you as well! 🙂 cheers!
This is very impressive. I’m not nearly handy or patient enough to make my own winter tent.. I had to bite the bullet and order a custom Atuk tent. Nice work!
Thanks so much! It honestly wasn’t that difficult. I am now planning to make a winter tent over the summer as I purchased a wood stove for the tipi and can use it for either or. 🙂 Thanks of following and checking out my blog. Looking forward to checking out yours further! Happy Camping!
Have you decided on a shape or pattern? The book “Snow Walker’s Companion” by Garrett and Alexandra Conover has a decent pattern. I’m using their snowshoe moccasin patterns this year (if I can assemble the other girls in my sewing group soon!)
No I have not. Thanks so much for the suggestion. i will definitely check it out. hmm snowshoe moccasins sounds very cool also. I will have to do some research (whenever I stop adventuring! lol) Winter is usually down time for me, but not this year! 🙂 Thanks again! 🙂
What a fantastic read and very informative. You may want to look into a paint drum wood stove as your next project which can run a stove pipe up thru your pole ring. Eliminates the smoke while providing heat and a cooking surface to boot. Job very well done
Hi Dave! Thank you so much for the awesome compliments and for commenting. I really appreciate it! You hit the nail on the head. I actually just purchased a wood stove for the tipi and am getting it ready to use for my next adventure! Great suggestion! Thanks for reading! I hope you get a chance to check out some of my other posts as well! Happy Adventuring! 🙂
I’m very impressed with your tipi! I’m interested in how you end up modifying it to get the smoke out, and whether it works better. You are very clever! You might want to read my instructions on how I built my sled for backcountry winter camping. It could be your next project. 🙂 https://kyraonthego.wordpress.com/2016/01/03/making-a-sled-for-backcountry-winter-camping/
Hey Kyra! Thanks so much for the comment and for reading my post! Sorry for the late reply. Was out adventuring this weekend! 🙂 I actually purchased a very economical wood stove so I will be testing it out at home the next few weeks and then in February at Macgregor! 🙂 Stay tuned! I love that you sent me our instructions on how you built a winter backcountry sled! It will definitely be on the project list! Next project is a car carrier for the top of my truck and then possibly a hot tent! 🙂 But I can see me making this in the next year or so? 🙂 Baby steps. I’m not sure I can live without heat out there yet! LOL I really appreciate this! 🙂 Cheers!
You are so creative and determined! You definitely found your passion in 2015 and so happy to have met you Camper 🙂 You put so much thought and work into making your tipi, teepee, lavvu, goahti. Whatever the name it is definitely a Camper Christina original. Great that you turned it into a father/daughter experience as well. I cannot wait to try it out in Feb. Great post, very detailed and adventurous! Thanks for sharing!
Awe! Thanks so much Karengeterdone! I can’t wait to hang out with you in it in February! Will be awesome for sure! 🙂 Looking forward to checking out your next post super marathoner star! xo
[…] with great information provided by Ontario’s Highlands, I’d solo winter camped in my homemade tipi at a really cool place called South Wind Motel & Campground. South Wind is run by a […]
[…] and am pretty proud of all my accomplishments. Some of them are, and not in any particular order: built my own tipi, camped in -42 degrees in a summer tent, earned my Level 1 Sea Kayaking Paddle Canada Certificate, […]
[…] many of you that have followed my winter adventures know, last year, I built my very own tipi from scratch and spent a few nights testing it out in various settings. Now that I have gained […]
[…] to their alone time, while Sam, Shylo and I headed out. I still had to make a few renovations on my tipi before my big interview tomorrow !!! (details coming soon!!ITS EXCITING […]
[…] to be able to continue. (summer tent with tarp and space heater in picture below). I built my tipi, put a woodstove in it, and with that I could now camp in the winter and be warm at night and I was […]
[…] wait until it was a done deal… but Kevin is putting a blurb that I’ve written about my DIY Tipi in his new book on winter camping! Very cool indeed! Thanks Kevin! It was great to finally […]
[…] with Kevin Callan a few times online at the start of 2017, as he had picked me to do a blurb on my tipi for his winter camping […]
I’m in the process of making my own hot tent/tipi and this post came up in my search, very informative and a great approach to making a traditional tipi using modern materials. I hope you learn to love the cold and snow and keep winter camping. I really enjoy watching your videos and reading your blogs.Thanks Christina for sharing your adventures.
Thank you soooo much Ross. I can’t tell you how much I appreciate your comment and checking out my blog. Are you making a hot tent/tipi similar to mine? I’d love to see pictures etc? 🙂 I need to find a way to make mine lighter. I wish I was settled into a house by now. i would be able to do so much more with my own space. sigh. I’ve been wanting to make another, different style and lighter version for backcountry, but it’s not easy when you rent. Can’t find a house where I am.
Nice Job! I’m going to study that door a bit, to see if it will work for me on my project. That wood disc was a great solution!
One thing I thought of, was to put a Velcro loop midway down, to anchor the fabric to the poles as you spread it around the frame. It would allow you to get the fabric in place before attempting to spread the base out. Some interior framed tents use them to stop flapping in the wind, but it occurred to me that it would also make it easier to spread the fabric out evenly without any twisting.
Also, since you know the diameter of the base, using a stick compass to draw a circle in the snow to mark the pole locations and minimize the adjustments to be made once you have the skin on.
I’m looking forward to see how you resolve the smoke issue….could a piece of pipe from the fire pit to the edge of the tent allow cold air intake without allowing a draft? I tried that the other night in my shelter, and it let me control the cold air intake quite effectively, and cap it off when the fire died down. I had several large rocks in the pit that provided a lot of heat…in fact, too much, LOL
Thanks so much George. I have a string that I use to check the diameter that’s measured to 13′ with a knot at 12 and lay that down to help me with the spreading out of the poles. The easiest part of the entire set up is putting the canvas on the bolts. The fabric doesn’t flap or move once the tipi is up and is quite secure. If it does, I just kick the pole out a few cm’s and all is solved. The tipi is not exact in any way and always needs to be adjusted depending on if one pole is deeper in the snow than another, or spread out farther than last time so it always needs tinkering but not a super huge amount of it.
Thanks for the great comment and for checking out my post. The smoke issue was resolved quite quickly. I put a wood stove in it and is what I’ve been using ever since. There are a lot of comments below the post if I remember correctly about how to solve the issue. I went with the easiest one and do not regret it at all. I love the wood stove. 🙂
If you’d like more info on the door, send me a messaage. I love the door. It’s my favorite part of the tipi! 🙂
I think I figured it out, LOL,,,,after cutting up lots of sheets of paper, LOL For a center pole design, I was having trouble figuring out how to make a weatherproof door since there are no poles down the side. relocating the door away from the seam solved the problem because it allows me to make an oversize door, with Velcro closures. Now….if I can figure out how to sew a pocket for fiberglass rods or tree branches to add some rigidity to the opening. I have had good luck sewing Velcro with the serger with double needles and nylon thread.
I like your stove idea, but since most of my camping in winter is on showshoes, I am trying not to have to pull a sled since I am in the mountains. The packable stoves seem to flimsy to use too often. That will force me into building a pit fire, and solving the smoke problem. I may have to resort to using aluminum dryer vent hose up the center pole and adding a chimney cap with spark arrestor. I will see what kind of hood I can devise out of aluminum flashing. It should be relatively easy to make a damper at the hood to stop heat loss when the fire is out.
BTW…I am building a scale model on a sheet of plywood in my living room, LOL It lets me use pins instead of stakes, We have been getting snow every night, and even though it melts during the day,the level ares are too sloppy to mess with putting up a tent to see how things fit together. The rivers are already icing up!
[…] November 2015, I built a DIY Tipi hot tent. It is awesome and I love it dearly, but unfortunately, the tipi is not made for the […]
[…] November 2015, I built a DIY Tipi hot tent. It is awesome and I love it dearly, but unfortunately, the tipi is not made for the […]
[…] year I built my second hot tent. This one specifically to take into the backcountry. The first, the tipi was made to do so as well but after a trip with my friend Ashley from Young Outdoors, I realized […]
[…] November of last year I built my very own backcountry winter hot tent. I had previously built a hot tent tipi, but as I learned on a backcountry trip with my friend Ashley, the tipi would be far too difficult […]