In November of last year I built my very own backcountry winter hot tent. I had previously built a hot tent tipi, but as I learned on a backcountry trip with my friend Ashley, the tipi would be far too difficult to take into the backcountry solo. As that was my intention at that time, I needed a tent that was lighter, smaller and feasible to take where I wanted to take it. So, I made the backcountry hot tent.
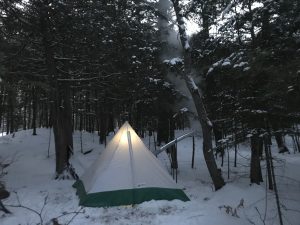

Once the tent was completed, I took it to Mew Lake in Algonquin Park for a test run with it and it did great! Now that I knew it worked how it should, I planned a trip to take the tent into the backcountry with my friend Sue to Go Home Lake. It was also a successful trip, so I planned a solo with it, taking it into the backcountry of Killarney Provincial Park.
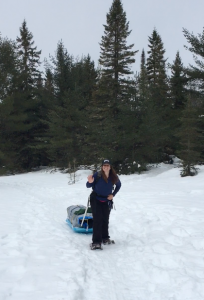
All trips were successful and I was very very happy with the backcountry hot tent I’d built. The only thing I wanted to add to the tent was a vent as I hadn’t planed one when I originally made the tent. On occasion, the tent got very hot and I just opened the door when that happened. Sometimes, not often, but once in a while, it also got a bit smoky, again, something which would make a vent useful.

Just a few days after my Killarney Solo Hot Tent trip, I hit my head and received a concussion which lasted over 5 months. I, unfortunately, wasn’t able to take the tent out again that season and until now, have been busy going out on summer and fall adventures. As winter is now approaching, however, it was time to make a few revisions to the hot tent for the season. Adding a vent was at the top of the list. I had procrastinated adding the vent almost a year, not only because I didn’t need to use it, but also because I wasn’t sure how to make a vent and had no huge desire to cut a hole in my lovely tent that currently worked very well. I was totally scared of doing it and therefore just let it be.

At the end of October, with the Ontario Winter Camping Symposium quickly approaching, I knew I had to make some decisions and put a vent in the tent. I played with a bunch of ideas and finally settled on one and began working on it.
As the tent is made of triangles, it was a no brainer to make the vent a triangular shape as well. It would fit into the design of the tent aesthetically, and most vents I’d see on regular tents such as my Eureka Suma 2 had a similar vent. I actually slightly based the vent I made on the vent on my Suma 2.

The first thing I did was set up the tent in the basement so I could check things out. As I had recently built a stand for the tent, which you can check out here, this was now simple to do.

I cut a triangle that would fit into the top of the panel that also had the stove jack on it, so the vent would be just above the stove, the most logical place for it.


I cut out a triangle that would be big enough and fit into the space where I wanted to put it and then pinned the sides to make the hems. Once this was done I sewed each hem to complete the triangle.


Once the hem was sewed nicely, I added 3 pieces of velcro to the bottom flap to close the vent when it wasn’t in use. Then I laid out the tent on the floor and placed the triangle on the tent exactly where I wanted to attach it and pinned it to keep it in place.

I stuffed the tent into the sewing machine, literally, and somehow attached the right and left sides of the triangle to the tent. It is always a bit of a struggle to get the tent parts under the tiny presser foot of the machine and place the tent where it needs to be sewed, but with a lot of patience, it can be done.

Once the triangle was affixed to the outside of the tent, I aligned the velcro on the triangle with where it should go on the tent and put 3 strips of velcro on the tent. Once this was done, I was ready to figure out where to cut, the scariest and most unnerving part of the project. I drew 2 lines with a pen on the inside of the tent. One to show where I needed to cut and one to show where I needed to fold over the edge to make a hem.

Once I cut out the triangle on the inside of the tent, I folder the edges underneath themselves. I pinned the bottom seam as I would sew it and used a glue gun to just fold over and glue the right and left seams underneath the fabric to make a clean edge.
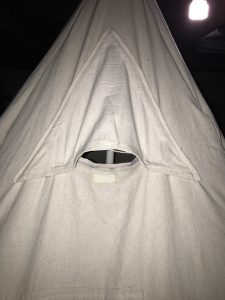

Once the bottom edge was sewn, I set up the tent to see how the vent would look and if it would work? I was actually pretty pleased with the result. When I attached the velcro on each side of the bottom of the triangle, it puckered and popped the vent open perfectly. This would keep the snow from falling inside the tent. I originally intended to use a stick of some sort to prop it open, but due to the stiffness of the material because it was folded over and thicker, and the way I sewed the vent on, it just stuck out without a stick to prop it open which was awesome!

There was however a big issue. I couldn’t fully close the vent and this freaked me out and worried me greatly. If I shut the vent before the tent was erected, it would stay shut but if it was opened at any time after set up, it would not close. The way the tent is made, there is a lot of tension and because I cut a hole in it, this tension was released in certain areas such as below the vent. It was now too loose to meet up and as the tent side was being pulled in several directions, it just didn’t want to close, now that it was open. I took the weekend away from the tent and did some brainstorming with a few friends David Bain the organizer of the Ontario Winter Camping Symposium, and Sean Rowley from Paddling Adventures Radio who both provided some good suggestions. When I returned home on Sunday, I had figured out a plan on how to fix the issue.

I created another triangle. This one being 2.5 ” bigger on all 3 sides than the original one and then hemmed the seams on each side.

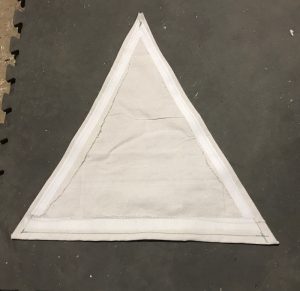
I then added the rough side of velcro to each side. I had only one piece of velcro with the sticky backing which was good as the sewing machine didn’t like sewing through the stickiness and caused me a lot of issues. The other 2 sides had the same type of velcro, the rough side, but they were thinner pieces without the sticky backing. I pinned them on and then sewed them on using zig zag stiches on either side of the velcro so as not to damage or dirty the needle and make the stitches work, which they did, quite easily to my surprise. I have discovered in the past that my machine doesn’t really love velcro so I was pleased when it took me very little time and it caused no issues at all.
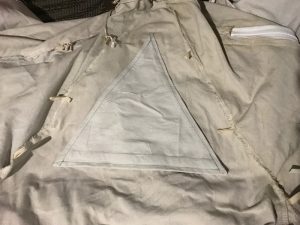
Once completed, I took down the tent and laid it on the floor. I placed the triangle on the inside of the tent where it would cover the entire hole of the vent and did my best to make it as evenly spaced as possible. This took some adjusting but eventually I got it to where it looked pretty good.

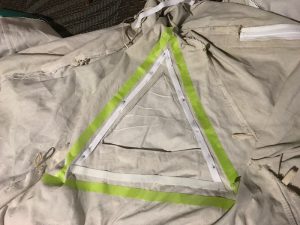
I then took some painters tape and outlined the triangle so it could be removed but I would be able to see where it would go. In the past, I have just used a pen to outline this, but when I sit in my tent I can see the lines and it looks messy, so I wanted to avoid marking it up further. I took the matching strips of velcro, the softer sides, and pinned them in place matching it up to the triangle that would attach to it. This again, took some fussing, but after a bit I had it just right.

I once again stuffed the tent into the sewing machine as best I could and attached the velcro to the inside of the tent where it had been pinned in place. Once again, I had no issues sewing it and was delighted.

I laid out the tent on the floor once more and checked to make sure the triangle lined up nicely with the velcro that was now attached to the tent. It seemed to be good. I removed the tape and set up the tent for the final test.

The triangle fit in place perfectly. I couldn’t have been happier with it. The vent hole was now completely sealed up from the inside and no draft would come in. However, if I needed the vent, all I had to do was remove the velco triangle by pulling down the top corner. I could leave the triangle flap hanging and still attached at the bottom, or completely remove it until I wanted to put it back onto the tent.

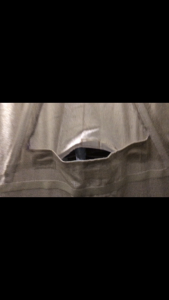
While working on the tent vent, I also noticed that the corner loops were not doing so well.

I had originally made them using the plastic coated canvas folded over several times and sewn as such. They were pulling out of the corners however and the loops were actually cracking. The choice to use this material for the loops wasn’t a good one and since I was revising the tent, it seemed like a good time to revise the loops also.

I found a good section of black webbing that would work perfectly. Once I removed all the old corner loops, I cut the webbing in 4 pieces (one for each corner) then folded each in half and pinned them to the corners. This time the loops would go along the seam and be attached to about 4-5″ of the tent instead of just putting them into the seam sideways and having only the width of the strap attached. This would add a lot of strength and keep any issues from happening… I hoped.


Once the loops were pinned to each corner they were sewed using zig zag stitching. The stitches were places farther apart than normal as the plastic coated canvas actually gets perforated with each stitch and makes it weak. With the stitches further apart, this would help the plastic coated canvas stay strong, but I also had an idea to help that even more.

Once each loop was attached securely to the tent, I made what I call a patch. This was somewhat diamond shaped and would cover the black webbing loop I’d just added and also keep it protected and inside a layer of plastic coated canvas. It also added a bit of flair and made it look nicer. It reminded me of an older styled blazer with elbow patches on it.


The new loops looked great and were so much stronger. I was pretty confident that these loops would last much longer than the originals and hoped they wouldn’t need repair again for quite some time.
Now that the vent was in place and the loops were repaired, the tent was ready for another season, hopefully, a much much longer one, of adventures this year.
Thanks so much for checking out my post. If you’d like to see the video that goes with this blog post, please check out my youtube channel. If you have any questions, comments or just want to say hi, please leave a message.
Happy Hot Tenting!
Camper Christina


Well done on the vent . What a great idea !
Thank you for sharing your techniques and experiences!
You’re very welcome Matty. Most of my hot tent information is on my youtube channel. Just look for the playlist and you can find them all there. Cheers!
Hi Christina!
This whole series has been pretty interesting. There’s a couple of observations that I’ve made, as a person who’s been involved with textile for a very long time, generationally.
When you hear your sewing machine, kind of making that almost clacking sound, you need to put lubricant on it to keep it from becoming a real problem. I noticed that in the first video, but wasn’t sure if it was sort of the way the audio equipment worked or whether it was the actual machine, but got the answer later on when the machine seized up and you had to do some maintenance on it.
In terms of ventilation, another very inexpensive option available might be to put a screen in the tent, to hold the integrity of the shape together, while still having that whole slit vent shape, or even a triangle shape going on. that way, weather was open or closed, the stress of the way to the fabric should not impact the shape integrity of the structure.
This has the added advantage of providing a little bit of protection from bugs for the times when you get an unseasonably warm day, and would like to have the window open, but are using the winter tent because of the cold nights.
That’s a very innovative way to handle the tie-outs on the corners. Thanks for sharing, and I hope to see how that works out over the long-term for you.
Hi there! Thanks so much for the comment. And for the great suggestions. Yes, the sewing machine needed to be oiled and have some maintenance done to it. I took care of that quite some time ago. This tent was created in 2017 and I have been using it almost every winter since. It has lasted a very long time and I almost retired it two years ago because I got a nylon tent but decided to continue using it because I love it so much. There is never a possibility of bugs coming into the vent as I only use this during winter. I do like the suggestion of putting something else in there to help keep the vent in place and shaped but I have made some other revisions to assist with that. If you enjoy this video series, you might want to check out the one on my bigger homemade hot tent. I created that tent two years after this one with all of the knowledge and things that I learned from creating the two tents before that. My big homemade hot tent is my favourite one and the most luxurious coming in at 10‘ x 14‘. It is mostly for glamping, however, and I am still using the Solo homemade tent for backcountry and other adventures. Thanks so much for commenting again and for all the great idea ideas. Cheers!